Post 1 - How to Share a Post on Facebook (Desktop & Mobile!)
Sharing a Post to Facebook on your Computer
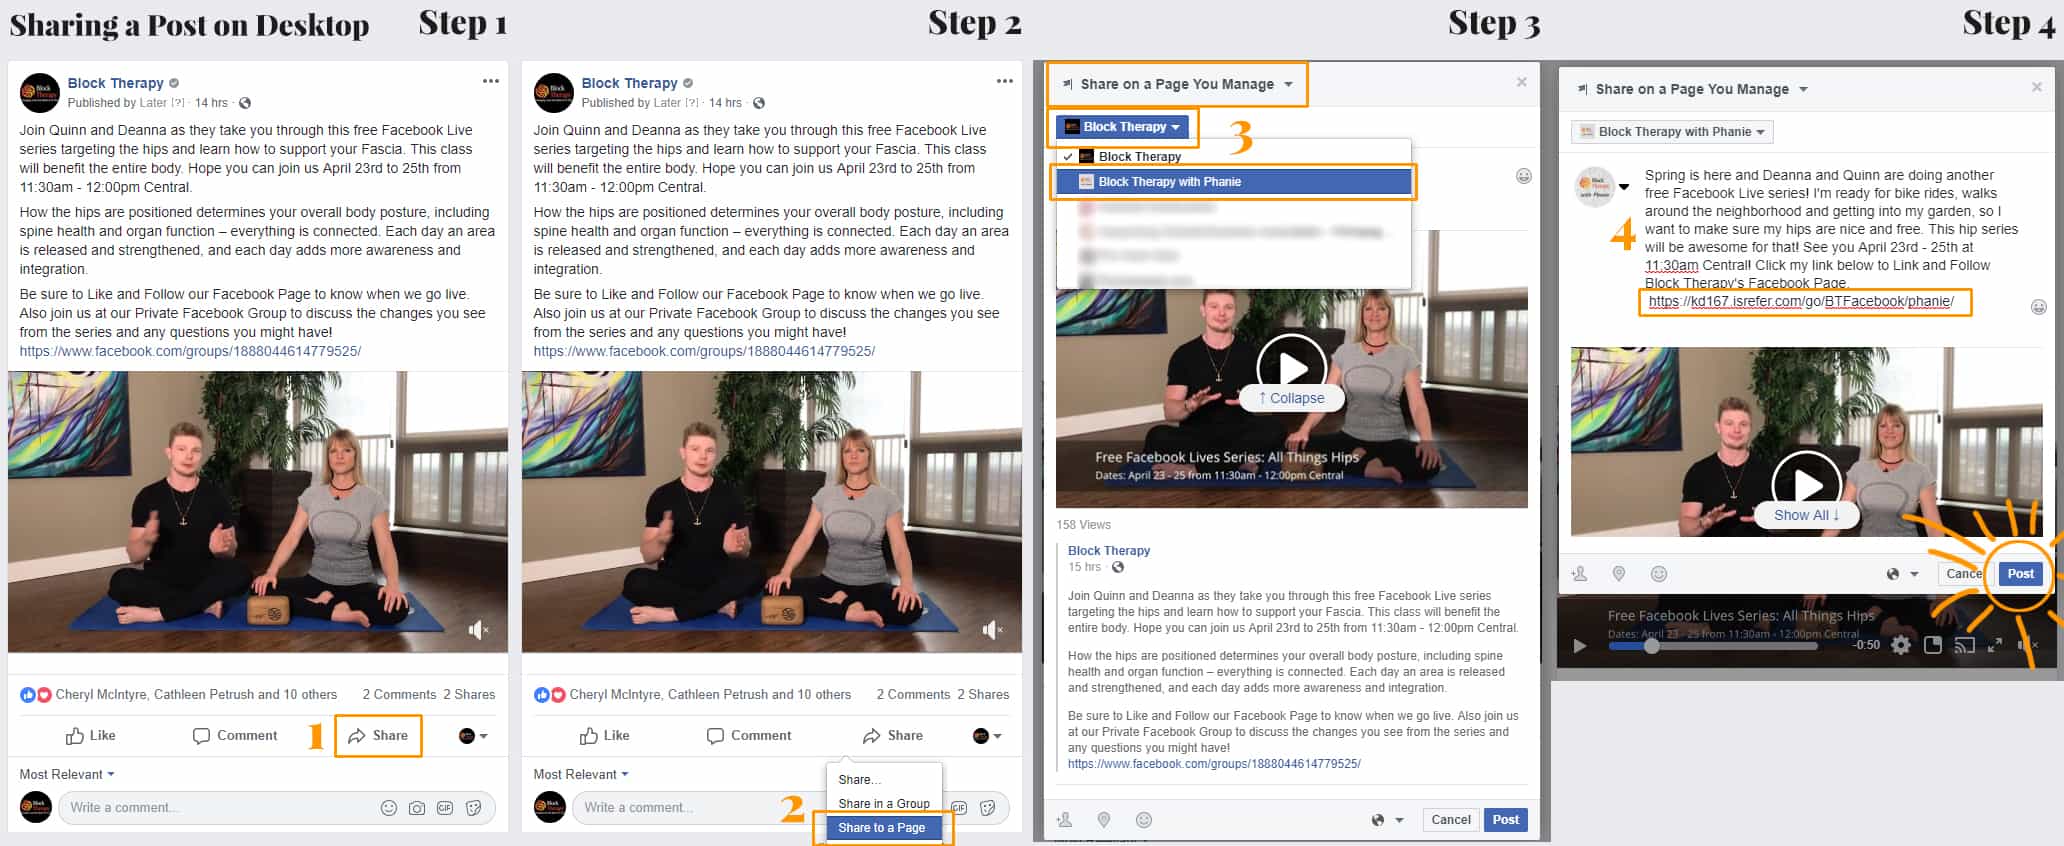
Step 1: Navigate to the post that you want to share! Here's the direct link below, or search Block Therapy and find the video/post you'd like to share.
https://www.facebook.com/DeannaHansenBlockTherapy/posts/2006271842834275
Once you are at the post, fine the "Share" button at the bottom and give it a Click!
Step 2: Once you click the share button, you'll see a dropdown with "Share, Share in a Group, Share to a Page" listed. Click the "Share to a Page" Option.
Step 3: A pop-up above the post will show up with all your sharing options. BE SURE that the top of this pop-up says "Share on a Page You Manage". If it doesn't, click the arrow beside whatever it says at the top, and make sure "Share on a Page You Manage is selected.
Next you need to be sure that you are posting to the correct page. Underneath the "Share on a Page You Manage" there should be the name of the Page you are looking to post to. If you manage multiple pages, you might need to change the Page that's auto-selected. Click the Page that is displayed, a dropdown will show up, and choose the correct Page to post to.
Step 4: Now you can add a personalized message to the post! I would strongly recommend writing at least one sentance about the post you are sharing. It could just a "Can't wait for this class!" but anything to give your Facebook followers a little personalized touch from you is best for interaction.
Depending on what you are sharing, keep in mind - is there a tracking link associated with what I'm sharing? In this case, yes! We have a tracking link for when you share the Block Therapy Facebook page. So if someone clicks that link, your tracking cookies will be added to whoever clicked it.
Lastly! Once you are happy with your description, click the Post button at the bottom right of the pop-up window. You're done!
Sharing a Post to Facebook on your Phone
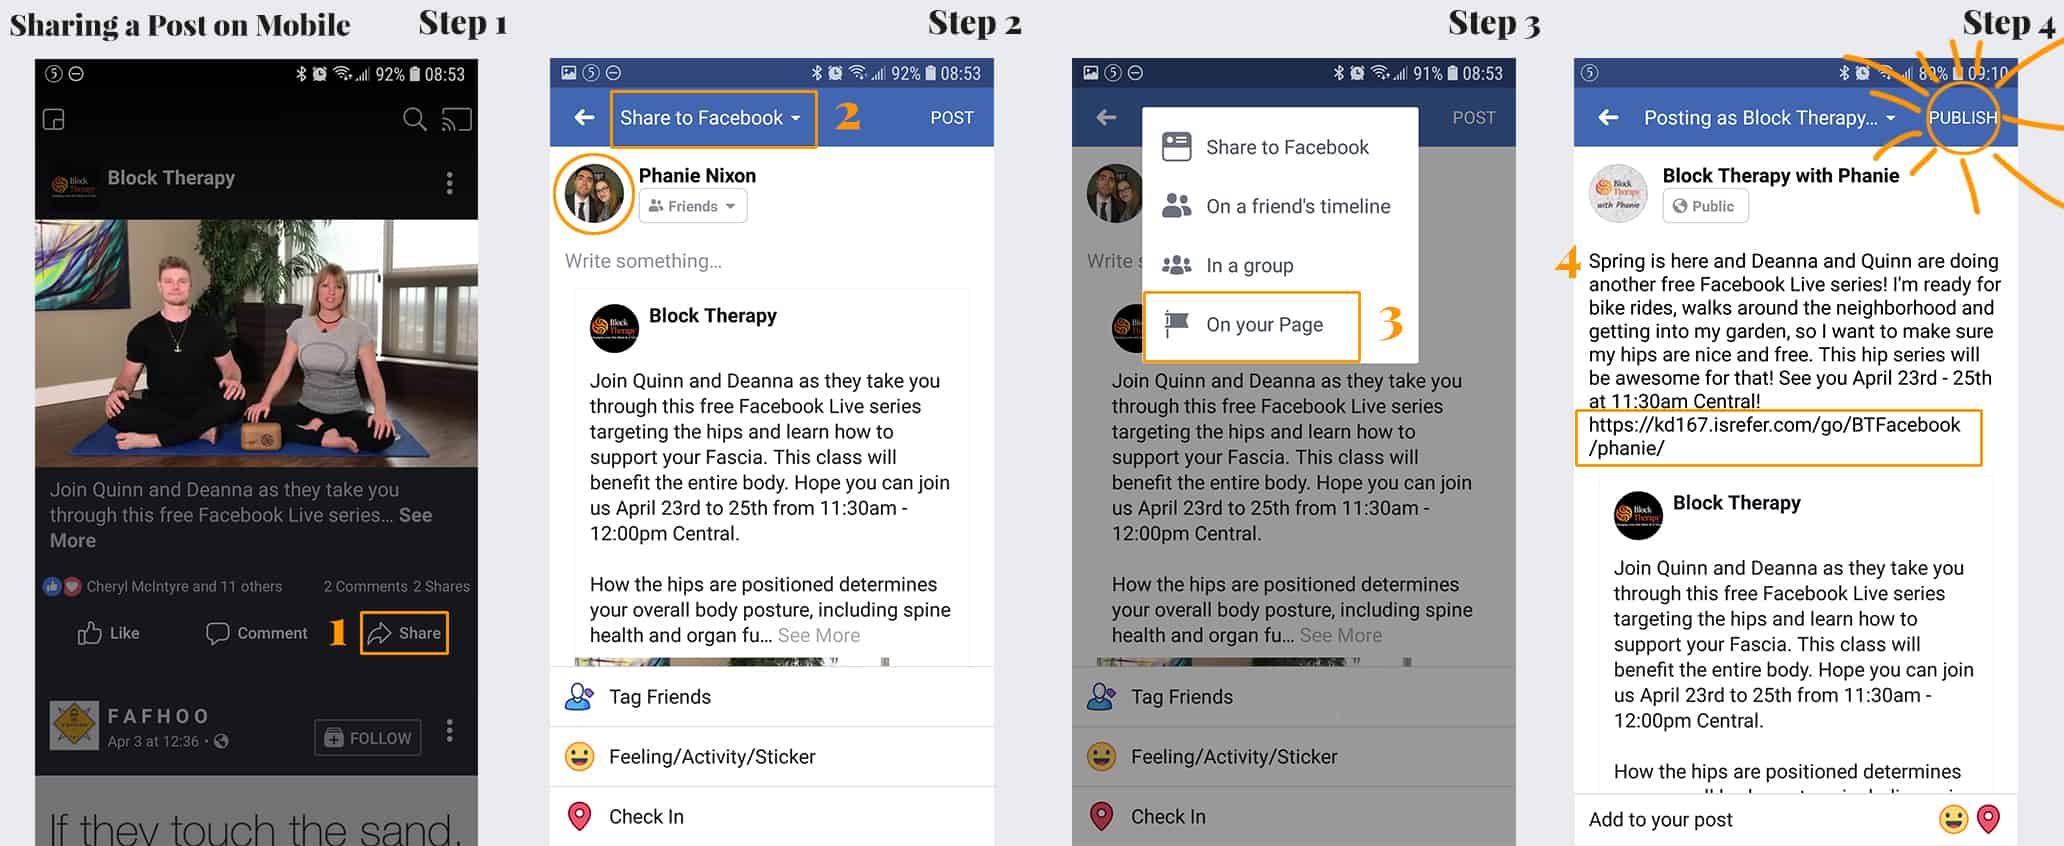
Step 1: Navigate to the post that you want to share! Here's the direct link below, or search Block Therapy and find the video/post you'd like to share.
https://www.facebook.com/DeannaHansenBlockTherapy/posts/2006271842834275
Once you are at the post, fine the "Share" button at the bottom and give it a Click!
Step 2: Once you click the share button, you'll be taken to a new window that says "Share to Facebook" at the top. Below that will most likely be a picture of your face/personal FB profile picture. We want to share to your Page, so click the "Share to Faceook" link at the top of that window.
Step 3: A dropdown will show up with all your sharing options. Click "On Your Page" and a list of your Pages will show up, or if you manage only Page, it will auto-select your Page.
Step 4: Now you can add a personalized message to the post! I would strongly recommend writing at least one sentance about the post you are sharing. It could just a "Can't wait for this class!" but anything to give your Facebook followers a little personalized touch from you is best for interaction.
Depending on what you are sharing, keep in mind - is there a tracking link associated with what I'm sharing? In this case, yes! We have a tracking link for when you share the Block Therapy Facebook page. So if someone clicks that link, your tracking cookies will be added to whoever clicked it.
Lastly! Once you are happy with your description, click the PUBLISH button at the top right of the window. You're done!
Post 2 - How to Post to Instagram
Step 1: Download/Acquire your photo!
First things first, you need to have/find the picture that you are going to be posting. In this case we are sharing the photo of Deanna using Two Blocks. We have a Google Drive folder with all the images we post. You can find the link to all those folders in our Teacher & Affiliate Resource Section.
For today's example, here's the direct link for you to download the image.
https://drive.google.com/open?id=1Q1FTzPMQlLiFE9Z9IO01DqUKmViDHdi4
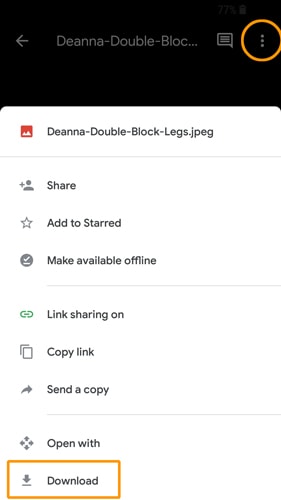
Once you've clicked the link above, you should see three vertical dots on the top right of the window. That will open a pop-up from the bottom of the screen. You might need to scroll up a little to find the Download option. Click the Download link and this image will start downloading to your phone!
Step 2: Open up Instagram/Be on the correct account!
If you only have one Instagram account, you are free to skip to Step 3, but if you have a personal and a business account there's one more step.
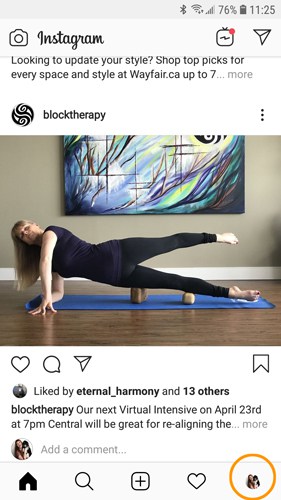
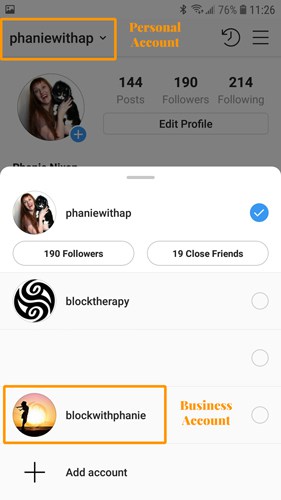
To see which account you are currently logged into, look at the picture in the very bottom right of your Instagram. If you see your personal Instagram account profile image, then you need to switch to your Business Account. Click your Profile Picture on the bottom right. Once you are on your Profile Page, click your name on the top left of the screen. You'll see other account options, and click which account you want to be posting to.
IMPORTANT INSTAGRAM FACT!
Instagram does not really allow links on it's platform. Only in your Bio or via Direct Messages. Or in Stories, but that's another topic and you need to have over 10k follows to get that ability. This is why you will see a lot of accounts saying "Click the Link in my bio" when they post. You'll have to do the same for your Tracking Link.
Step 3: Adding in your Tracking Link. You should have your list of Tracking Links saved somewhere safe. For this image, we'll be using the Virtual Intensive link. Go to your list of Tracking Links and Copy the Virtual Intensive link. This is what mine looks like.
https://kd167.isrefer.com/go/virtualintensives/phanie/
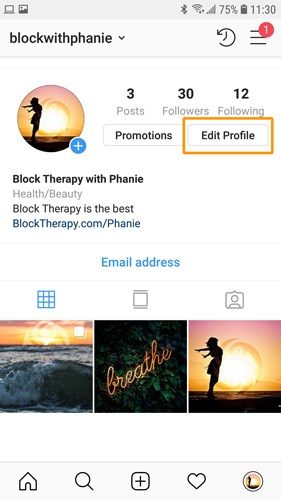
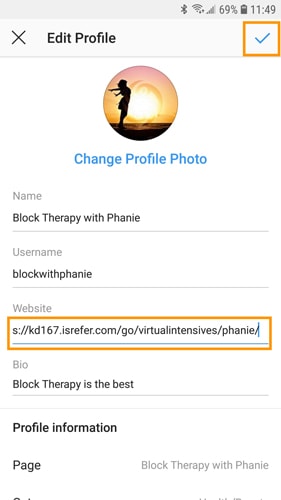
Go back to Instagram and go to your Profile page. That's the far-right icon in the bottom menu bar. Either your account Profile picture, or the outline of a person. Once you're there, click the Edit Profile button. Find the "Website" field, backspace the existing link if there is one (you will put it back later) and paste your Tracking Link there. Once added, click the check-mark at the top right of this screen.
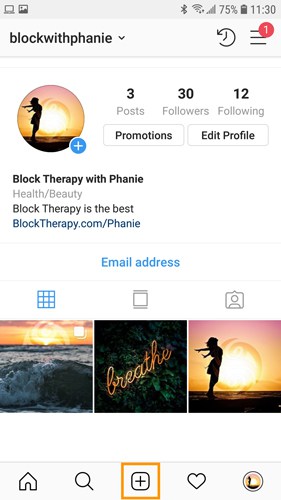
Step 4: Click the Post button! The Post button is the Plus Sign inside a square in the middle of the bottom menu bar for Instagram. Once you click that, you can choose from your gallery what image you want to post. If you just downloaded the image from the link above, it should be the first image in your gallery. If not, click the image you want to post.
Step 5: To Crop or Not to Crop!
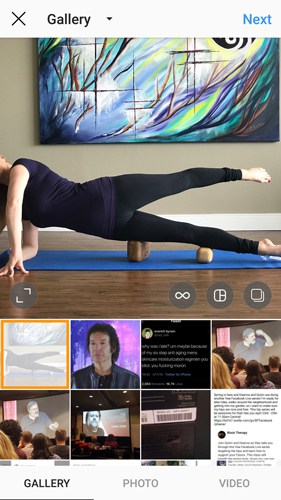
Instagram tends to prefer square photos, and by default will crop them. But sometimes it's important to have the full image, like in this case. We don't want to cut off Deanna's head! So to make the image full sized, click the "Full Size" icon at the bottom left of the photo you've chosen. Now you can click Next at the top right!
**Note: We'll go over Filters and Edit options in a later guidance. For now feel free to play with the filters or just click Next at the top right to go to the next step.
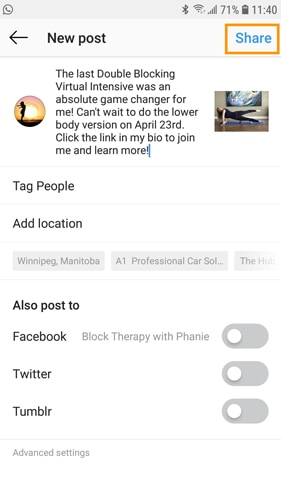
Step 6: Add your personal flair. Lastly here is where you would put your personalized description and a reminder to check your Bio to get the link. You can write whatever you'd like, but try not to be too long, as Instagram posts get cut off (a "See More" link will appear) after 125 characters.
When you are happy with your description, click Share at the top right! You're Done!
Post 3 - How to Share a Post on Instagram
Instagram is more complicated to share posts on than Facebook, but with the help of an App you can still share no problem! Here's the general guidelines for sharing a post from Instagram:
- The Profile that you want to share from must be public. Did you request to follow this person and they approved it? Then you can't share their posts, and the option to do so just won't exist.
- You must first download the photo to your phone using an additional App.
- Give credit where credit is due! If you are sharing a photo, that profile/person might've put a lot of effort to create their post. We would always recommend you credit a profile when you share their post or if you aren't giving credit, at least ask permission to share. You can add their profile name to the image as mentioned below, or you can tag the Profile which we'll go over in a future lesson! THOUGH with Block Therapy, you all have full permission to share any of our photos, and don't need to add the caption bar if you don't want to.
Step 1: Download a Repost App
Go into either the Apple Store or Google Play to download a new app. In the search bar type "Repost Instagram". There are surprisingly quite a few of these apps that do exactly the same thing.
I have "Repost for Instagram" installed, but I've heard good things about "Reposta" or "Regrann". They all do the same thing! I'll recommend Repost for Instagram, just because that's what the screenshots will be.

Step 2: Find the Post you want to Share
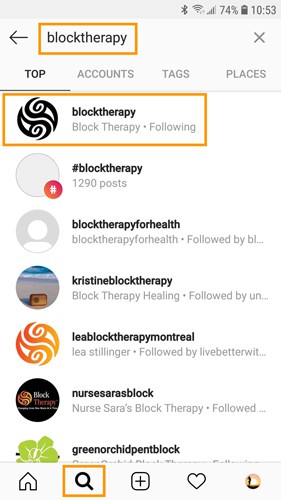
In today's example we are going to post the Happy Easter picture from the Block Therapy page. The fastest way to get there will be to search the page. Go the to "Explore" tab on the bottom Instagram menu bar. This is the magnifying glass icon.
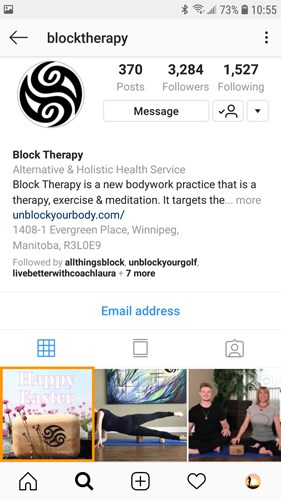
Here you'll find suggested content for you to enjoy, and the search bar at the top. Type in Block Therapy and click on the Block Therapy page. We have a black swirl as our logo! Once you're on our profile, click on the image you want to share.
Step 3: Get the Share Link for the Post
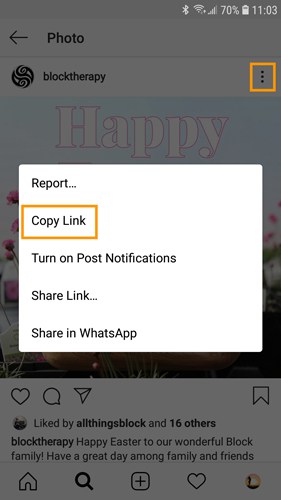
Once you have found the post you want to share, you need the link of where it "lives" for your Repost App. To get this link you click on the "Options" button above the photo. These are the three vertical dots across from the Profile Name. Click there and a pop-up will show up with your options. We want the "Copy Link" option.
Once you Click the "Copy Link" option, your screen should show a little text bubble that says "Copied" letting you know this link is now in your Clipboard.
Step 4: Paste your Link into the Repost App
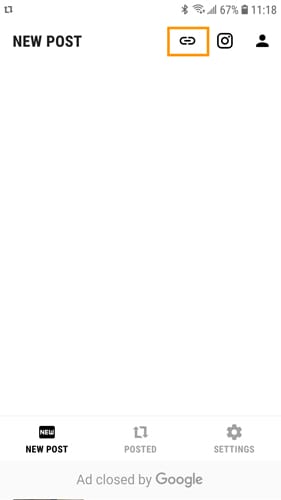
Next you'll need to navigate back to your Repost App and paste your link. For Repost for Instagram, you can see a Link icon (looks like a paperclip) at the top menu bar, next to NEW POST. Click that Link icon, and a text field will appear. This is where you add your copied link.
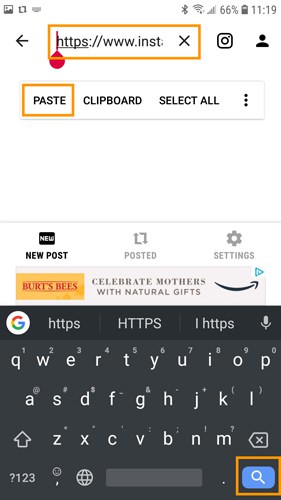
Press and hold on that text field and the option to "Paste" will appear. Next click the Search icon or Enter button on your keyboard for the post to show up. Click the post when it shows up!
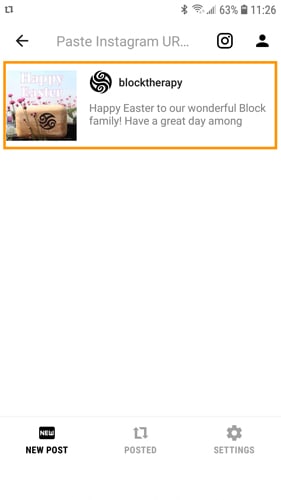
Step 5: Customize & Post your Photo
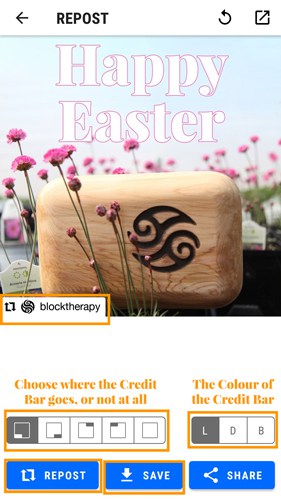
With Repost for Instagram, you can credit the profile you are sharing from by adding a little watermark on the corner of the image. Depending on the image you can change which corner it's located, what colour the text and colour bar are, or if you want give no credit at all. Once you like the way your Credit Bar looks, or lack there of, you're ready to share!
If you want to post just the image you have made and no caption, you would click the SAVE button. This will save the image you have created above and you are free to post to Instagram. You can follow along from Post 2's instructions above from here.
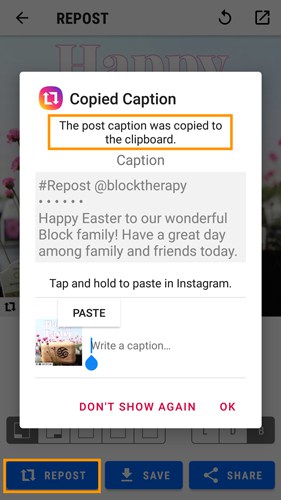
If you want to post the image you have made and the caption that originally went along with it, you would tap the REPOST button. This will automatically copy the original caption to your clipboard with instructions on how to paste it into your Instagram post. You can follow along Post 2's instructions, but this time when you are ready to write your description, you will tap and hold, choose paste to get the original Block Therapy caption. Feel free to still add your own little message!
Post 4 - How to Like or Comment as your Facebook Page
Step 1: Find the post that you want to Like or Comment on.
Once you are at the post, take note of the icon beside the comment section (circled in orange), that's who you are/will be posting as. If it's already your Facebook Page, you can skip the rest of this step. To change who you are posting as, click the icon beside the Like, Comment, Share buttons.
The more you comment and like around Facebook, the more you'll notice it becoming second nature to see who you are posting as. Keep an eye on the photo beside the comment box as that can be your guide.
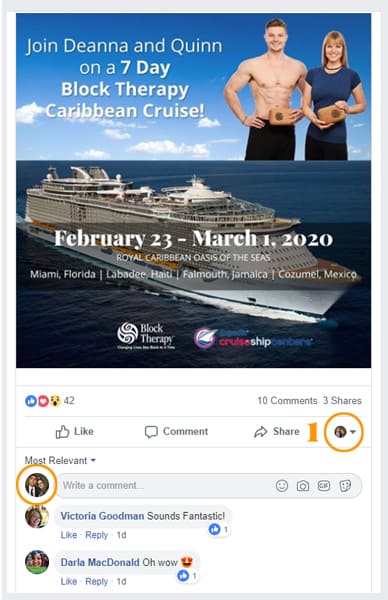
Step 2: Click your Profile Picture with the arrow beside it
Once you click the icon, you'll see a pop-up with your personal account and a list of any Pages you manage. Click the Page you want to post to. You'll then notice that the image beside the comment box and the Like, Comment, Share buttons has changed. You're now posting as that Page!
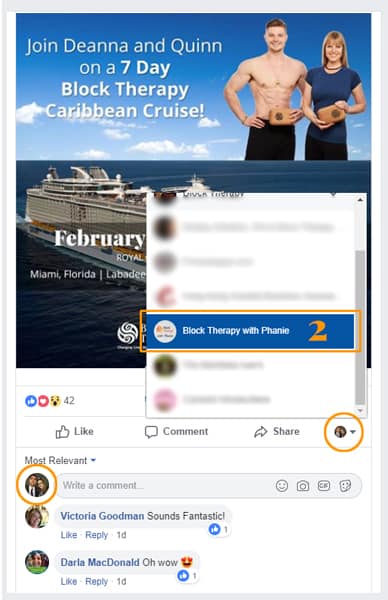
Step 3: Comment or Like away!
Once you have your Page Profile picture as the icon beside the comment box, you can comment as your Facebook Page and Like the post.
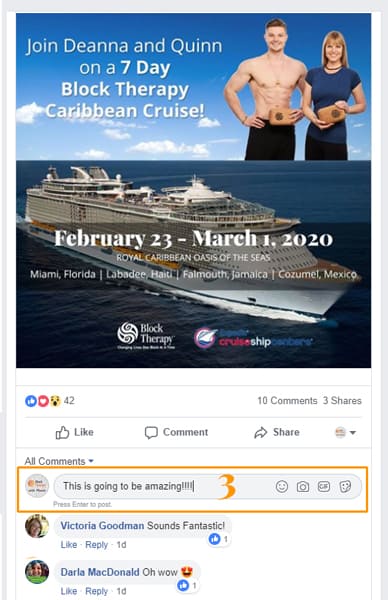
Post 5 - Differences Between Posting a Link and Image on Facebook
When you add a link/URL into the Facebook "Create Post" area, Facebook automatically reads that link and can share information about what is on that page. When developers create a web page, they can choose an image to go along with that page, and that is what Facebook will display. These are usually called "Featured Images". The trouble is some featured images are cropped weird, blurry or just plain ugly and you want to be able to choose your own image.
Below are a list of options to share a link on Facebook. You can choose which option fits best, depending on the post.
Sharing a Link as part of your Description
This would be a good choice when sharing a link that is "pretty" and has a nice Featured Image with it. You would think of the Link/URL as something that you would say out loud in conversation and not an "ugly" link that you want to hide, like our tracking links can be.
Here's an example to the right, or I might say "If you want to learn more about Block Therapy, check out my page BlockTherapy.com/Phanie". Facebook reads that URL, sees the featured image associated with it, and then displays that image when you post. If they both look good, the URL and the image associated with it, feel free to post away!

Removing your "Ugly" Link in your Description
If you want to hide from your Facebook Followers that you are using an affiliate link, you can just remove it! In this example I wrote a description, then added my affiliate link at the end. Once Facebook has "read" that link and displayed the Featured Image, you can just backspace the link until it's gone.
The link will still be associated with the featured image, and that's what people will click. They just can't see the long "ugly" url!
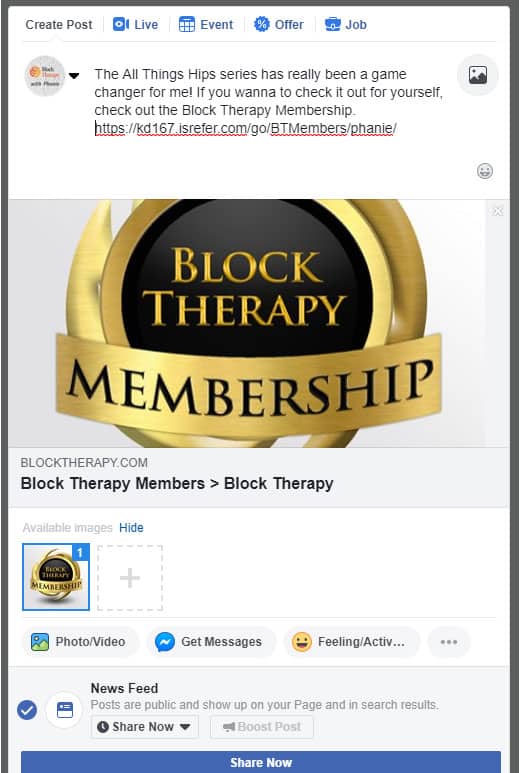
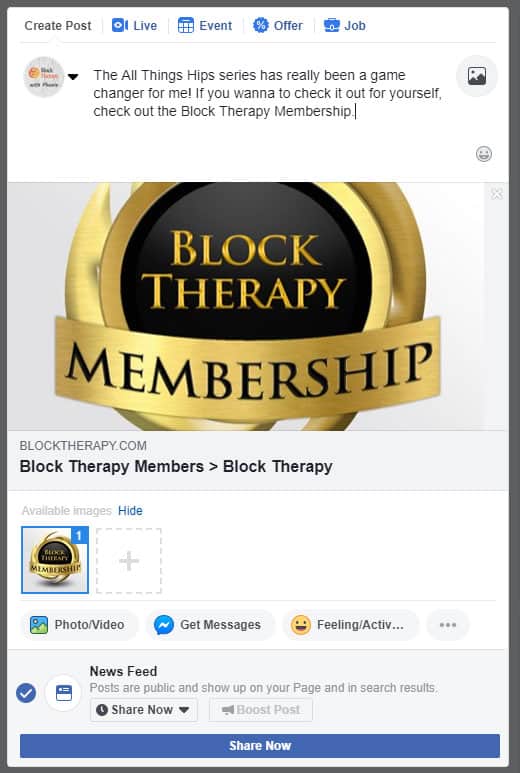
Posting a Photo with a Link instead of just a Link
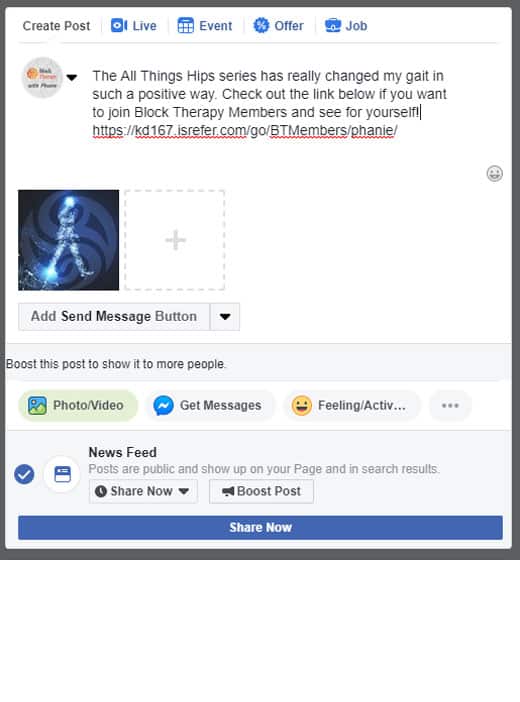
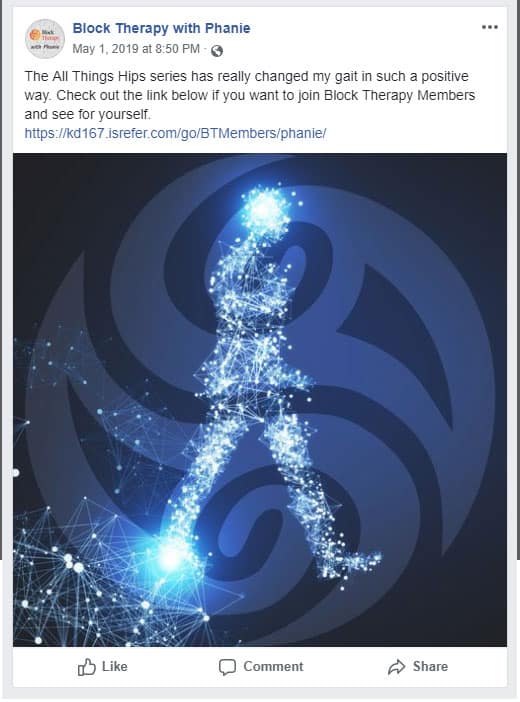
Sometimes the featured image that goes along with a Link is just not use-able, or you have another photo that's much better that you'd prefer to use. In that case, you can upload the photo you prefer and just have the link in the description!
Here's an example of what that looks like as you are drafting the photo post, and what it looks like once it's posted. This doesn't hide the "ugly" link, but its way more visually interesting which is the most important thing.
Also we'll be going over how to hide the "ugly" links all together in a later tutorial!
Post 6 - Downloading Testimonials from Google Drive
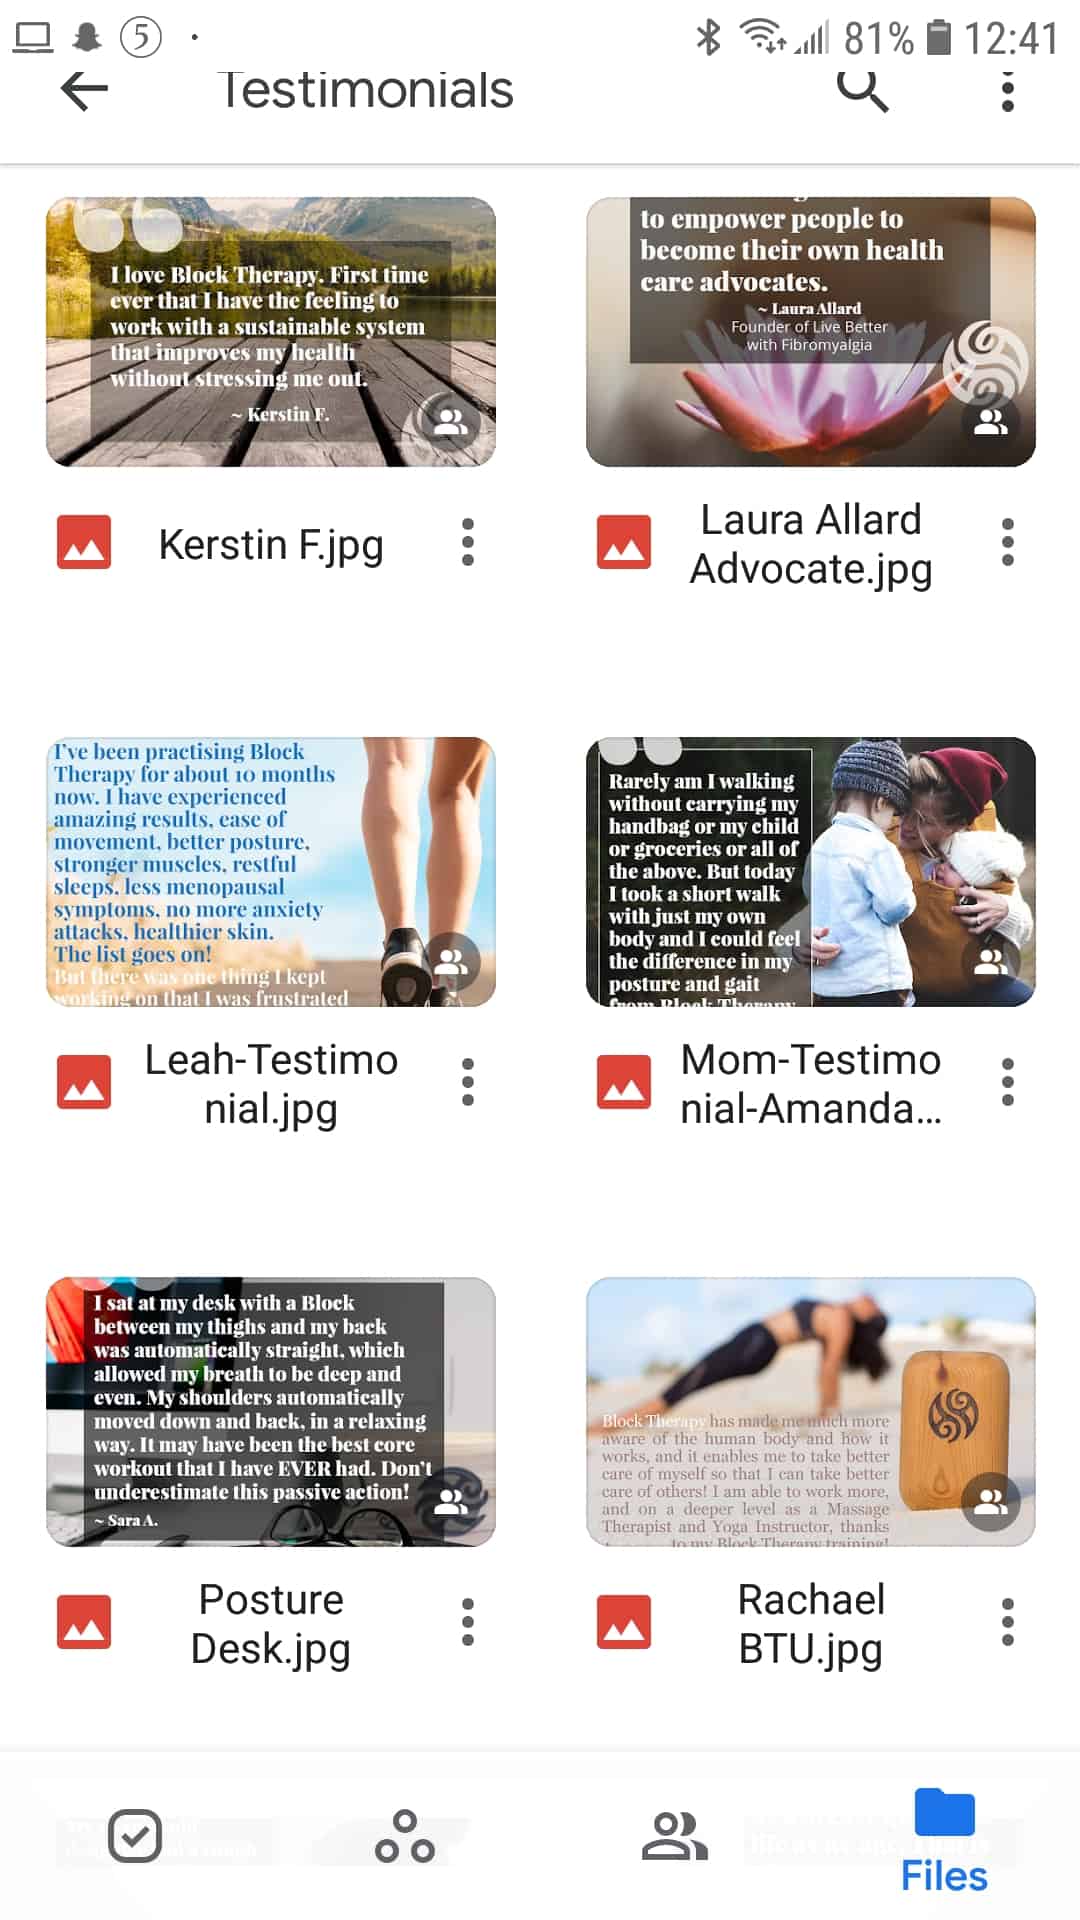
We're constantly updating our Google Drive and filling it with photos, testimonials and videos for you to share. You can find the link to all those folders in our Teacher & Affiliate Resource Section.
To get you familiar with our Google Drive folders, and practicing your personal "voice" on social media, you can choose a testimonial that you relate to or like the best. You can also choose a photo/testimonial that relates back to a program that you would like to promote and use your affiliate link with.
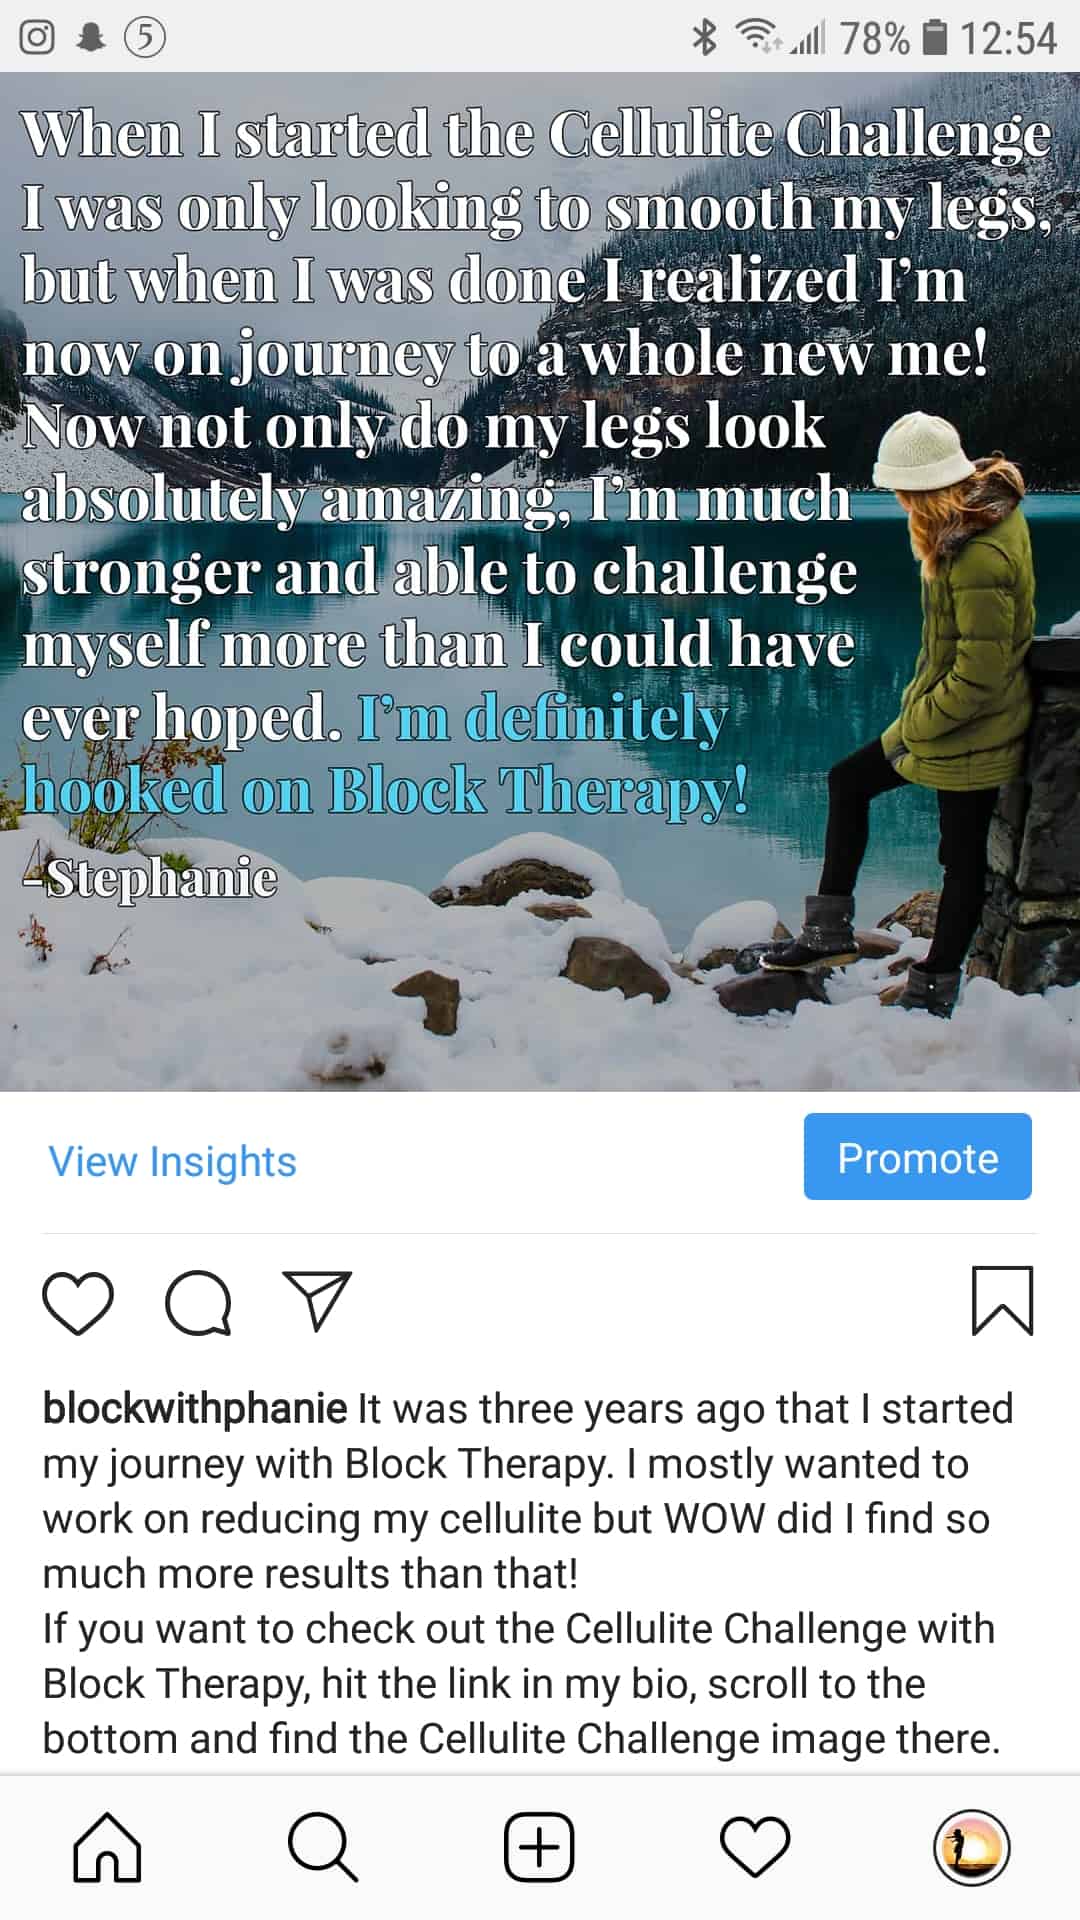
I happen to have a photo with my own testimonial that I'll share and use my affiliate link promoting the 21 Day Cellulite Challenge.
Quick reminder from Post 2 above on how to download the images from Google Drive. You'll see three vertical dots across from the title of the image, that's the options button. Click it! That will open a pop-up from the bottom of the screen. You might need to scroll up a little to find the Download option. Click the Download link and this image will start downloading to your phone!
We'll be going over how you can create your own eye catching testimonials on your phone in another lesson, but I've also made testimonial images for people in the past. If you'd like to request one you can email us at info@fluidisometrics.com but stay tuned for our upcoming GPS posts!
Here's the description that I made for my post, as well as how I directed people to check out the corresponding tracking link:
It was three years ago that I started my journey with Block Therapy. I mostly wanted to work on reducing my cellulite but WOW did I find so much more results than that!
If you want to check out the Cellulite Challenge with Block Therapy, hit the link in my bio, scroll to the bottom and find the Cellulite Challenge image there. You won't regret it!
Post 7 - Mentions, Tags, and Geo-Tags
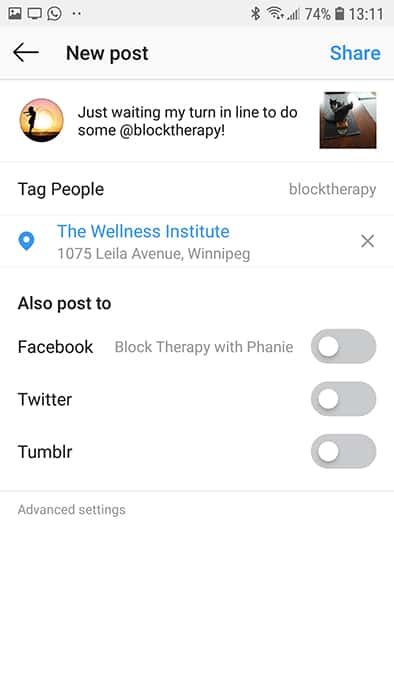
Social Media is really all about interactivity. If you mention, tag or geo-tag a business they might share your photo, or tag you in future posts they create, which shares your account with a whole new circle of followers. It's getting the word out for your business!
It just feels fun/special to be tagged/mentioned by another account, so it's good to do that to other accounts! But what is the difference between a Tag, a Mention or a Geo-Tag? I'm going to the difference on Instagram, but Facebook is basically identical.
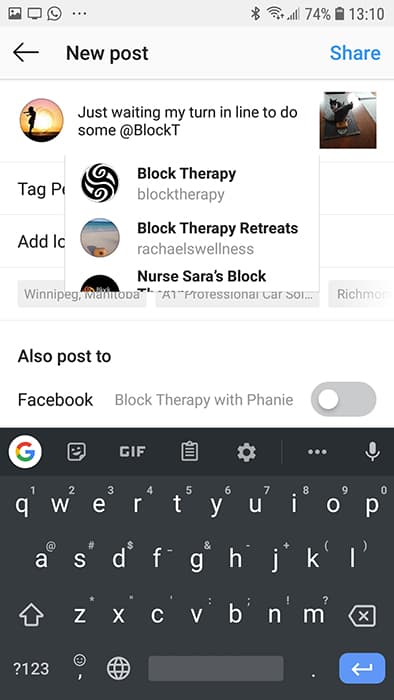
Mention - This can be done in a description of a post you are creating or in a comment. All you need to do is write the @ symbol, and start typing. Both Instagram and Facebook will start searching for the person you are trying to Mention. With Instagram they will keep the @ Symbol, but with Facebook once you select who you are mentioning, the @ symbol will disappear and the name will highlight blue.
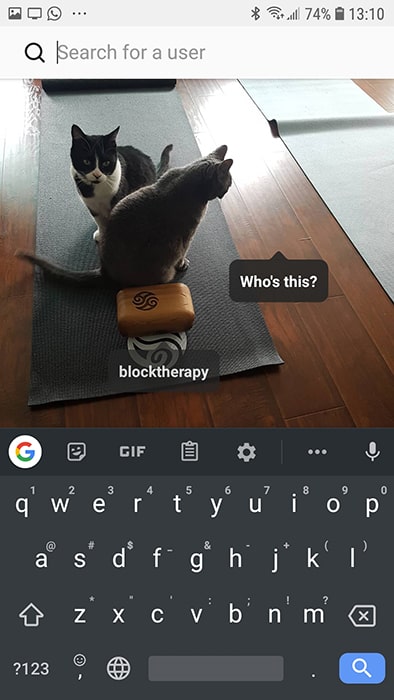
Tag - This is when you are saying WHO is in the image that you are posting. If someone taps or hovers over the image when it's posted, a little pop-up will show up saying exactly where that person is in the photo.
Geo-Tag - Did you teach a class at a studio or take pictures at a famous local location? That's where you'd Geo-Tag the business or place. On Instagram it will say "Add Location" when you are uploading a photo, and Facebook will say "Check-In".
Mention
Tag
Geo-Tag
